
Introduction to VRPsych:
VRPsych was a part of a project I developed with a team of 5 people, as part of my final year project in Computer Science Engineering.
We built a VR simulation of the “Spot the difference for Cognitive Decline” test, which helps us measure the signs of cognitive decline in an individual, a good indicator for dementia. Our system aims to provide an affordable alternative to the traditional techniques, allowing greater research and development in the field.
The Spot the difference for Cognitive Decline test goes as follows:
- We show the candidate a picture of an environment with objects scattered around like the example below.
- We allow the candidate to observe the above image for 2 minutes exactly.
- After 2 minutes we take away the first picture and we give the second picture to observe.
- The candidate must find the differences in the second picture from the first one within a time limit.
- After the time is up, the candidates results are saved.
We follow a very similar flow with VR version of the test as well.
In addition to the VR test, we conducted a similar traditional test on the website in order to run a comparative analysis of the varying results between the two typees of tests. Results from the traditional and VR test were sent to a database where it was then used to display the different results on our webisite.
Technology used:
I decided on using Unity and C# for building the VR environment and interactions, thanks to the support and ease of use, as well as avaialabilty of VR SDKs that we could use.
We made use of Google’s free and open source, Google VR SDK this was used to make our environments playable through a mobile device with the help of a Google Cardboard or similar VR headwear that would effectively use the phone to view the VR environment and interact with it. We also built in the option to use the mobile as a Magic Window for users who do not have a Google Cardboard or similar headset.
General Flow
The game starts off with a form where we explain the general purpose of the app and how to interact with the objects in VR and what those interactions mean. The user should specify some details about themselves and then proceed with the application in Non-VR (which starts with the Magic Window) or VR mode (for Google cardboard and other phone attachable VR headsets).
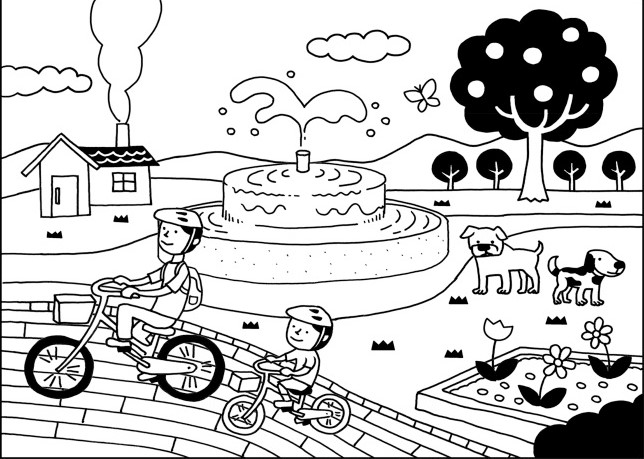
After this the user is transported to a picturesque scene of a garden with distinct objects and creatures as part of it. They are allowed to observe this scene for around 2 minutes and identify objects in the game world. A picture of this scene is shown below.
The player is able to move around the environment by interacting with the teleport panels.

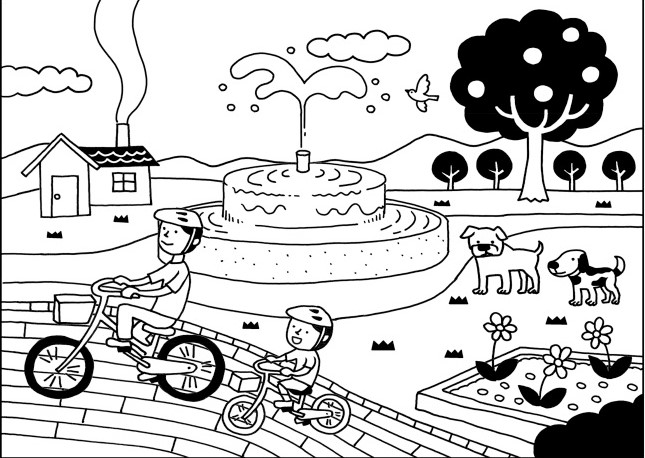
After 2 minutes the player is teleported to an intermediate scene whcih waits for a few seconds before transporting the player to the second environment. The second environment is as shown below.
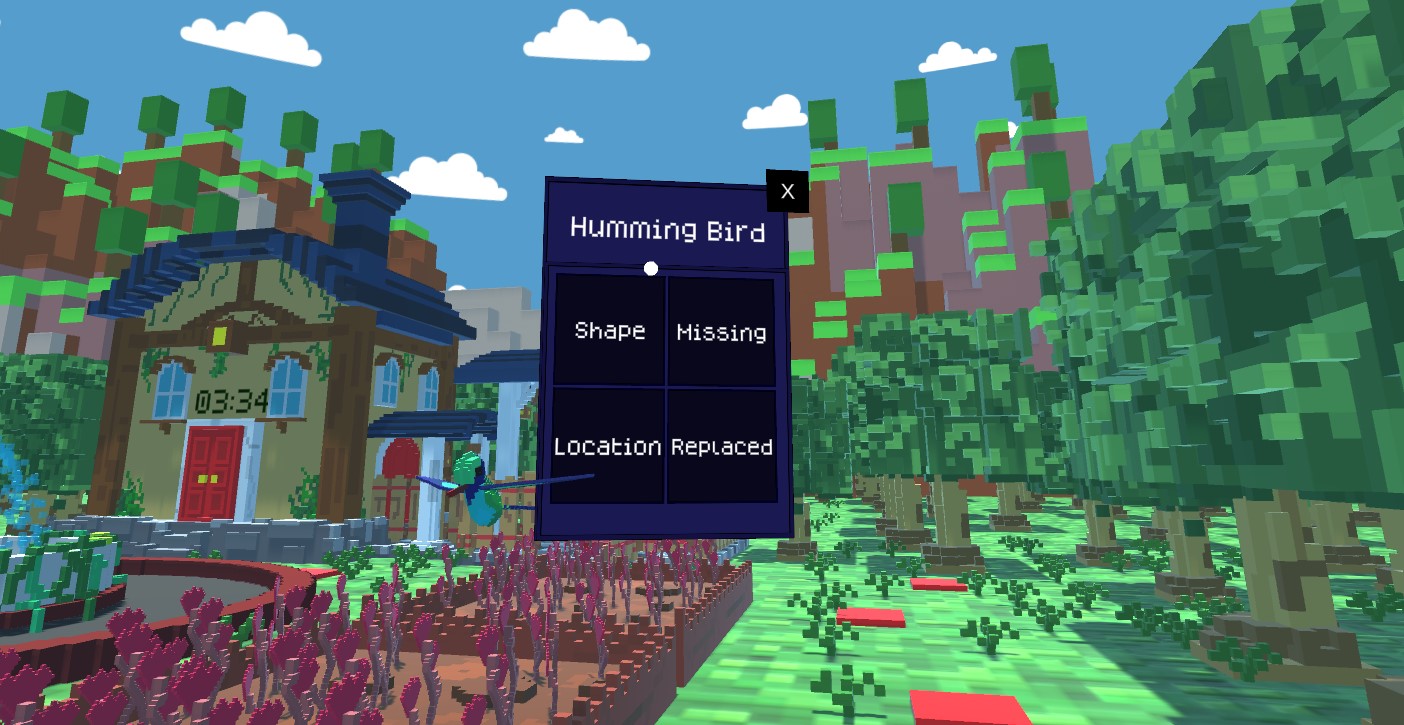
In the second environment, the players can interact with objects and choose how they are different or have been changed from the previous environment.
Moving objects will slow down when interacted with, to help maintain interaction.
After the time is up the Player is taken out of the environements and the results are saved and stored in json format so that it can be analyzed later.
Code Architecture
The code architecture of this application was mostly following the singleton pattern. This was due to the small size of the code base and the features required.
Gaze script
This script keeps track of the VR pointer and its interactions. Its static instance is used to query the state of the pointer, based on which certain interactions trigger. The script has an update loop that handles the pointer like this :
// boolean value that starts pointer fill-up animation.
if (gvrStatus)
{
    gvrTimer += Time.deltaTime;
	// fraction between completion time since last frame and the total time of the animation we require.
	imgGaze.fillAmount = gvrTimer / totalTime;
	// firing a ray from the centre of the screen
	Ray ray = Camera.main.ViewportPointToRay(new Vector3(0.5f, 0.5f, 0f));
	// Condition to check if the fired ray has hit an object
	if (Physics.Raycast(ray, out _hit, distanceOfRay))
    {
		//Checks if the ray has hit a teleport panel
		if (imgGaze.fillAmount == 1 && _hit.transform.CompareTag("Teleport"))
        {
			// Function call to teleport player
			_hit.transform.gameObject.GetComponent<Teleport>().TeleportPlayer();
        }
		// Checks if the ray hit an interactable object.
		if (imgGaze.fillAmount == 1 && _hit.transform.CompareTag("Interactable") && gvrStatus)
        {
			// Function that opens the decision panel
			_hit.transform.gameObject.GetComponent<ObjectInteract>().InteractPanelON();

            gvrStatus = false;
            imgGaze.fillAmount = 0;
        }
        // Check to see if gaze is complete
        if(imgGaze.fillAmount == 1 && gvrStatus)
        {
            full = true;
            gvrStatus = false;
            imgGaze.fillAmount = 0;
        }

    }
}
The gvrStatus boolean is set when looking at an object the player can interact with.
The above code uses a timer and a raycast to determine if an interactable object or teleport panel is being looked at. Once the imgGaze.fillAmount is full the object will be interacted with by checking the full boolean.
Game Manager
The Game Manager is responsible for the flow of the game and the saving of data. Its three main responsibilities include : -> Keeping track of the timer for the current scene. -> Keeping track of all the objects chosen in the current scene. -> Calculating the score of the user. -> Packing the users score data into a Json and saving it.
One of the main operations of the Game Manager is calculating the VRSDCD score. This score is caluculated as below:
public void ScoreCalculation()
{
    // The time it took for the player to complete the this level.
    test_completiontime = Mathf.RoundToInt(TimerForScene - scene_timer);
    Debug.Log("test completion : " + test_completiontime);
    PlayerPrefs.SetInt("Test_Completion_Time", test_completiontime);

    foreach(ObjectInteract obj in ChosenObject)
    {
        if(obj.correct_choice!=null && !obj.decision)
        {
			// objects in which the players have noticed a difference but
			// couldn't narrow down exactly what the difference was are considered
			// as "partially true".
			partialTrueObjs++;
        }
        if(obj.correct_choice!=null && obj.decision)
        {
			// objects in which the players have noticed a difference and
			// chose exactly what the difference was are considered
			// as "correct".
			correctChoiceobjs++;
        }
    }

    // Only a part of the partially true scores ae considered to be added to the final score.
    addfactor = (float)partialTrueObjs / 10;
    buffer = correctChoiceobjs + addfactor;
    vrsdcd = Mathf.Round(buffer * 10) / 10;
    PlayerPrefs.SetFloat("VRSDCD_Score", vrsdcd);
    Debug.Log($"Player's Current VRSDCD Score is -> {PlayerPrefs.GetFloat("VRSDCD_Score")}");
}
A partial true answer is when the player finds a difference in the object but does not accuarately describe its difference.
A correct answer is when the player finds the exact difference of an item between the 2 scenes.
Partial truths and completely correct answers are considered and used to calculate the final score, which is then packed into a json file which is later sent to a database and eventually shown on a website.
UI Pointer Detector
The UI Pointer Detector script is very similar to the gaze script. The only difference is that it uses the graphics raycaster instead of the physics raycaster to detect UI.
if(statusUI)
{
    uiTimer += Time.deltaTime;
    GazeScript.instance.imgGaze.fillAmount = uiTimer / totTime; //uses animation from gazescript
    myPointerEventdata = new PointerEventData(eventSystem);
    myPointerEventdata.position = Camera.main.ViewportToScreenPoint(new Vector3(0.5f, 0.5f));

    List<RaycastResult> results = new List<RaycastResult>(); //stores whatever the graphics raycaster hits
    uiRaycaster.Raycast(myPointerEventdata, results);
    if(results.Count>0)
    {
        foreach (RaycastResult result in results)
        {
            if (GazeScript.instance.imgGaze.fillAmount == 1 && (result.gameObject.transform.CompareTag("CloseButton") || result.gameObject.transform.CompareTag("DecisionButton")) && statusUI) //checks if the raycast has hit a decision button or close button
            {
                result.gameObject.GetComponent<Button>().onClick.Invoke(); // Invokes whatever function is attached to the respective button.
                statusUI = false;
                GazeScript.instance.imgGaze.fillAmount = 0;
            }

        }
    }
}
Just like the GazeScript we check for raycast hits and if a valid button is hit, we invoke its respective OnClick event.
This script is mainly used for interacting with the panels in the second level, when the player has to find the differences betweem objects.
Object Interact
This script is a component attached to all the objects that are interactable in the second scene, where the player can interact with these objects and choose the difference. This script contains the logic for toggling the Interactable panel and some methods of the panel buttons itself.
/// <summary>
/// Called after the player chooses an option.
/// <br>Checks if the right choice was made and disables interactability with this object.</br>
/// </summary>
/// <param name="c"></param>
public void ChoiceMade(int c)
{
    playerChoiceArray[c] = true;
    switch(c)
    {
        case 0 :
            player_choice = "shape";
            break;
        case 1:
            player_choice = "missing";
            break;
        case 2:
            player_choice = "location";
            break;
        case 3:
            player_choice = "replaced";
            break;
        default :
            player_choice = null;
            break;

    }
    decision_TimeStamp = Mathf.RoundToInt(GameManager.instance.scene_timer);
    GameManager.instance.AddChosenObjects(this);
    //Checks whether right or wrong choice was made.
    DecisionObserver(playerChoiceArray);
    //Disables this interaction permenantly.
    DisableObjIntPermenant();
}
The method above is responsible for determining whether the player has made the right choice and stores the choice in a player_choice string. This player choice is then saved for calculating the user score later.
Once the player has interacted with an object and made a choice, it cannot be interacted with again.
Conclusion
In conclusion, this project served as one of the first instances in which I had to work as part of a team and have the responsibility of architecting a VR application from scractch. Here is a recording of a session in the VR test :